


Bài viết này gồm 2 phần
Trước khi đi vào việc thực hiện, có 1 số công cụ tôi sử dụng trong suốt bài viết này mà các bạn cần nắm được như sau:
- Tailwindcss: css framework cung cấp các class hỗ trợ việc dựng giao diện nhanh chóng
- Next.js: một reactjs framework tuyệt vời ở thời điểm hiện tại
- Firebase: sử dụng dịch vụ Firebase Authentication
- Typescript: hỗ trợ định nghĩa kiểu dữ liệu
- yarn: công cụ quản lý package thay cho npm
Cài đặt
Việc đầu tiên cần làm là cài đặt Next.js và Tailwindcss. Tôi sẽ sử dụng create-next-app để tạo next.js project, bổ sung thêm option --typescript
$ yarn create next-app nextjs-firebase-authentication --typescript
Cài đặt Tailwindcss, các bạn có thể tham khảo cách cài đặt tại đây
$ yarn add -D tailwindcss@latest postcss@latest autoprefixer@latest
Tiếp theo, tạo 2 file config của Tailwindcss tailwind.config.js và postcss.config.js
$ yarn tailwindcss init -p
Sau khi câu lệnh trên chạy xong, sửa nội dung của file tailwind.config.js như dưới đây, mục đích của việc này là cung cấp cài đặt để Tailwindcss loại bỏ những style không được sử dụng khi build production
// tailwind.config.js
  module.exports = {
   // purge: [],
   purge: ['./pages/**/*.{js,ts,jsx,tsx}', './components/**/*.{js,ts,jsx,tsx}'],
    darkMode: false, // or 'media' or 'class'
    theme: {
      extend: {},
    },
    variants: {
      extend: {},
    },
    plugins: [],
  }
Đến đây là hoàn thành 9/10 việc cài đặt rồi, giờ ta cần tích hợp tailwindcss vào source code. Để làm việc này các bạn cần import nó vào globals.css
/* ./styles/globals.css */
@tailwind base;
@tailwind components;
@tailwind utilities;
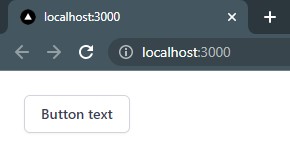
Thử xem Nextjs đã được tích hợp tailwindcss chưa
// pages/index.tsx
import type { NextPage } from "next";

const Home: NextPage = () => {
  return (
    <div className="m-6">
      <button
        type="button"
        className="inline-flex items-center px-4 py-2 border border-gray-300 shadow-sm text-sm font-medium rounded-md text-gray-700 bg-white hover:bg-gray-50 focus:outline-none focus:ring-2 focus:ring-offset-2 focus:ring-indigo-500"
      >
        Button text
      </button>
    </div>
  );
};

export default Home;
Tạo trang Login
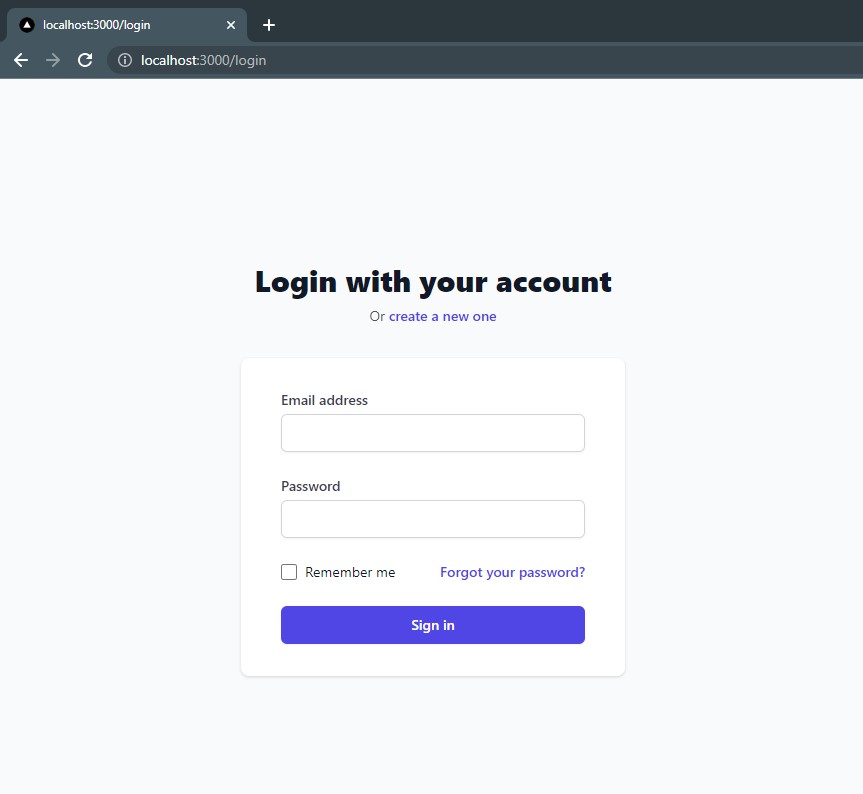
Việc đầu tiên cần làm là tạo 1 trang login. Để tập trung vào xử lý authentication nên chúng ta sẽ đơn giản hóa bước này. Nên tôi sẽ dùng tailwindcss chỉ tạo ra 1 trang login gồm 2 input là email và password
// pages/login.tsx
export default function Login() {
  return (
    <>
      <div className="h-screen flex flex-col justify-center items-center py-12 sm:px-6 lg:px-8">
        <div className="sm:mx-auto sm:w-full sm:max-w-md">
          <h2 className="mt-6 text-center text-3xl font-extrabold text-gray-900">
            Login with your account
          </h2>
          <p className="mt-2 text-center text-sm text-gray-600">
            Or{" "}
            <a
              href="#"
              className="font-medium text-indigo-600 hover:text-indigo-500"
            >
              create a new one
            </a>
          </p>
        </div>

        <div className="mt-8 sm:mx-auto sm:w-full sm:max-w-sm">
          <div className="bg-white py-8 px-4 shadow sm:rounded-lg sm:px-10">
            <form className="space-y-6" action="#" method="POST">
              <div>
                <label
                  htmlFor="email"
                  className="block text-sm font-medium text-gray-700"
                >
                  Email address
                </label>
                <div className="mt-1">
                  <input
                    id="email"
                    name="email"
                    type="email"
                    autoComplete="email"
                    required
                    className="appearance-none block w-full px-3 py-2 border border-gray-300 rounded-md shadow-sm placeholder-gray-400 focus:outline-none focus:ring-indigo-500 focus:border-indigo-500 sm:text-sm"
                  />
                </div>
              </div>

              <div>
                <label
                  htmlFor="password"
                  className="block text-sm font-medium text-gray-700"
                >
                  Password
                </label>
                <div className="mt-1">
                  <input
                    id="password"
                    name="password"
                    type="password"
                    autoComplete="current-password"
                    required
                    className="appearance-none block w-full px-3 py-2 border border-gray-300 rounded-md shadow-sm placeholder-gray-400 focus:outline-none focus:ring-indigo-500 focus:border-indigo-500 sm:text-sm"
                  />
                </div>
              </div>

              <div className="flex items-center justify-between">
                <div className="flex items-center">
                  <input
                    id="remember-me"
                    name="remember-me"
                    type="checkbox"
                    className="h-4 w-4 text-indigo-600 focus:ring-indigo-500 border-gray-300 rounded"
                  />
                  <label
                    htmlFor="remember-me"
                    className="ml-2 block text-sm text-gray-900"
                  >
                    Remember me
                  </label>
                </div>

                <div className="text-sm">
                  <a
                    href="#"
                    className="font-medium text-indigo-600 hover:text-indigo-500"
                  >
                    Forgot your password?
                  </a>
                </div>
              </div>

              <div>
                <button
                  type="submit"
                  className="w-full flex justify-center py-2 px-4 border border-transparent rounded-md shadow-sm text-sm font-medium text-white bg-indigo-600 hover:bg-indigo-700 focus:outline-none focus:ring-2 focus:ring-offset-2 focus:ring-indigo-500"
                >
                  Sign in
                </button>
              </div>
            </form>
          </div>
        </div>
      </div>
    </>
  );
}
Đổ màu cho background để có độ tương phản nhất định
/* styles/globals.css */

@tailwind base;
@tailwind components;
@tailwind utilities;

body {
  @apply bg-gray-50
}
Cài đặt Firebase SDK
Trước khi cài đặt Firebase thì các bạn cần phải tạo Firebase Project và đăng kí app đã. Trang chủ của Firebase cũng hướng dẫn chi tiết cách làm. Truy cập vào hướng dẫn tạo Firebase Project và thực hiện Step 1
Cần phải đảm bảo sau khi tạo Firebase Project, các bạn phải có được thông tin configuation như dưới đây ( ví dụ thôi nhé, sai đấy 😃)
// firebase configuration

const firebaseConfig = {
  apiKey: "AIzaSyCZCS8Kw3I65nVjNSQ09bkZtkvdmeUIxg4",
  authDomain: "next01.firebaseapp.com",
  databaseURL: "https://next01-default-rtdb.asia-southeast1.firebasedatabase.app",
  projectId: "next01",
  storageBucket: "next01.appspot.com",
  messagingSenderId: "205499221374",
  appId: "1:205499221374:web:c04a4fff5dfc2e370e964f",
  measurementId: "G-CTFB3NN1RB"
};
Quay trở lại project và cài đặt Firebase SDK thông qua terminal
$ yarn add firebase
Đoạn firebase config ở trên giờ đã đến lúc lên sàn. Các bạn tạo 1 file mới trong project và chép đoạn cài đặt dưới đây vào. Sau đó là nhảy sang bước Đăng nhập
// ./libs/firebase.ts

import { initializeApp } from "firebase/app";

const firebaseConfig = {
  apiKey: "<YOUR_KEY>",
  authDomain: "<YOUR_KEY>",
  databaseURL: "<YOUR_KEY>",
  projectId: "<YOUR_KEY>",
  storageBucket: "<YOUR_KEY>",
  messagingSenderId: "<YOUR_KEY>",
  appId: "<YOUR_KEY>",
  measurementId: "<YOUR_KEY>"
};

// Initialize Firebase
const app = initializeApp(firebaseConfig);
Đăng nhập qua Firebase Authentication
Tạo mới file dành riêng cho xử lý đăng nhập và cũng dễ dàng maintain hơn về sau.
// ./services/sign.ts

import "../libs/firebase";
import { getAuth, signInWithEmailAndPassword } from "firebase/auth";

const auth = getAuth();

export const signInWithEmail = (email: string, password: string) => {
  return signInWithEmailAndPassword(auth, email, password)
    .then((userCredential) => {
      console.log(userCredential.user);
    })
    .catch((error) => {
      console.log(error.code);
    });
};

//
Cập nhật nội dung của file login.tsx như sau
// pages/login.tsx

import React, { FormEventHandler, useRef } from "react";
import { signInWithEmail } from "../services/sign";

export default function Login() {
  const emailRef = useRef<HTMLInputElement>(null);
  const passRef = useRef<HTMLInputElement>(null);

  const onSubmit = (ev: React.FormEvent<HTMLFormElement>) => {
    ev.preventDefault();
    if (!emailRef.current || !passRef.current) return;

    const email = emailRef.current.value;
    const password = passRef.current.value;

    signInWithEmail(email, password);
  };

  return (
    <>
....
            <form
              onSubmit={onSubmit}
....
                  <input
                    ref={emailRef}
                    id="email"
....

                  <input
                    ref={passRef}
                    id="password"
....

    </>
  );
}
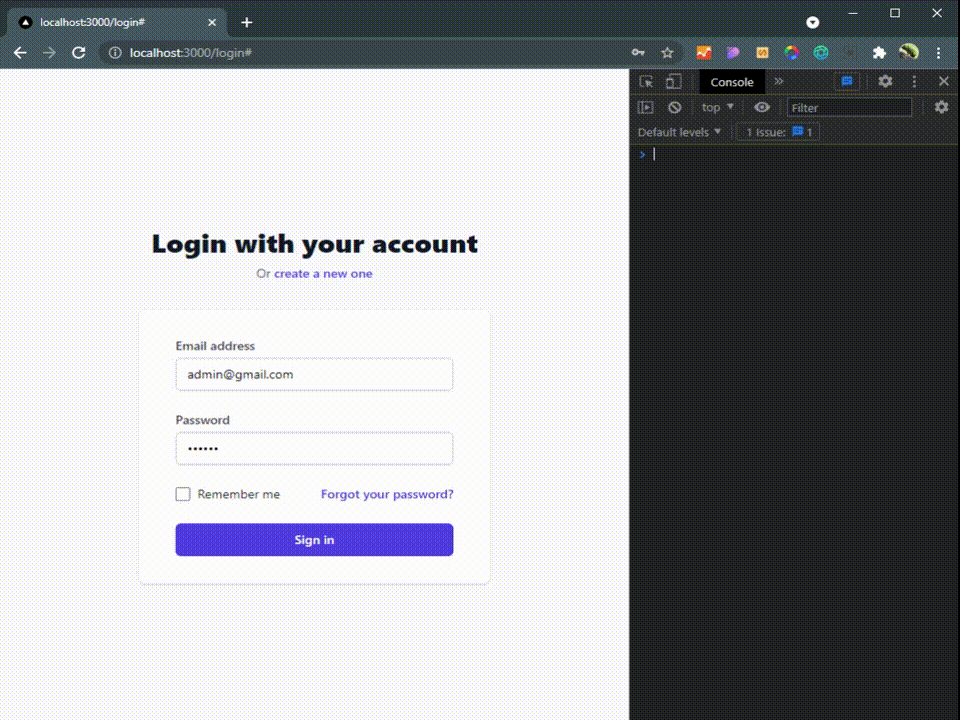
Nếu đoạn code trên gây ra lỗi như bên dưới có nghĩa là việc đăng nhập hoạt động, nhưng do user chưa tồn tại nên không thể đăng nhập được
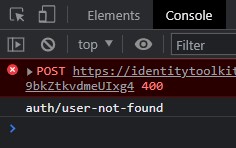
Tiếp theo, chúng ta sẽ tạo user để quá trình trên hoạt động. Có 2 cách để tạo user là: sử dụng firebase sdk hoặc tạo trực tiếp trên firebase console
Tôi sẽ sử dụng cách thứ 2, tạo trực tiếp trên firebase console. Các bạn thực hiện theo các bước dưới đây:
- Truy cập vào địa chỉ https://console.firebase.google.com/
- Chọn Project để chuyển vào màn hình Admin
- Tại section Build > chọn Authentication
- Tại tab Sign-in method, chọn Email/Password và enable nó lên
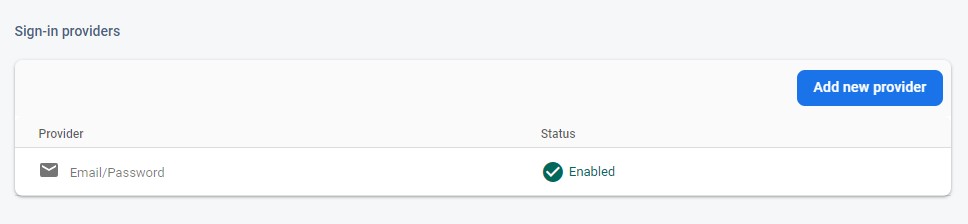 Enable email method (Xem ảnh gốc)
 - Quay trờ lại tab Users và nhấn Add user để tạo tài khoản
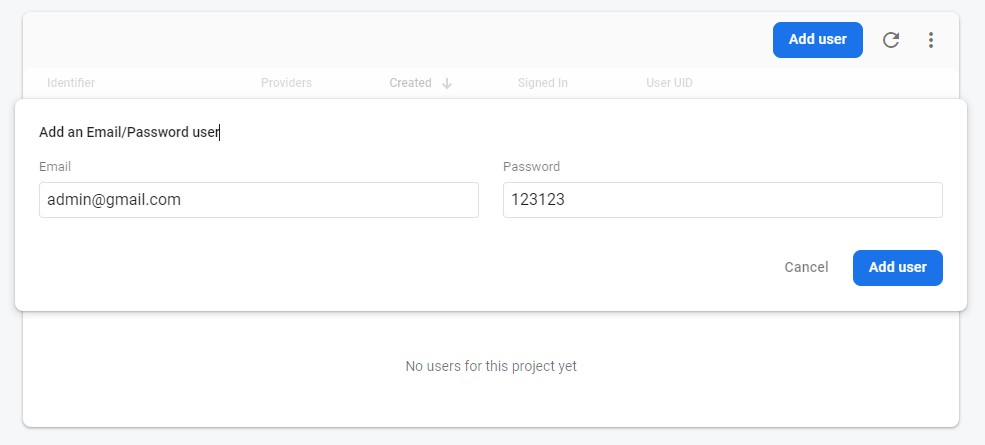 img-8.jpg (Xem ảnh gốc)
OK. giờ thử login lại nào
Kết luận
Phần 1 của bài viết Authetication sử dụng Firebase đến đây là kết thúc. Tôi sẽ hoàn thành bài viết này ở phần tiếp theo với việc tạo ra Custom token và xác thực nó.
Hẹn gặp lại các bạn trong phần tiếp theo