


Chào ae, lại là tôi @hudy đây
Mới đây, tôi đã viết 1 hướng dẫn về cách tạo 1 notebook - desktop app - sử dụng Tauri. Nhưng có vẻ nó không thể hiện được hết tiềm năng của Tauri. Do vậy, tôi đã quyết định tạo 1 app khác - một code editor đơn giản (một phiên bản cực đơn giản giống VScode)
Dưới đây là 1 vài chức năng cơ bản của "chiếc" app ta sẽ làm:
- đọc file và thư mục bên trong thư mục dự án
- tạo mới file
- chỉnh sửa nội dung file
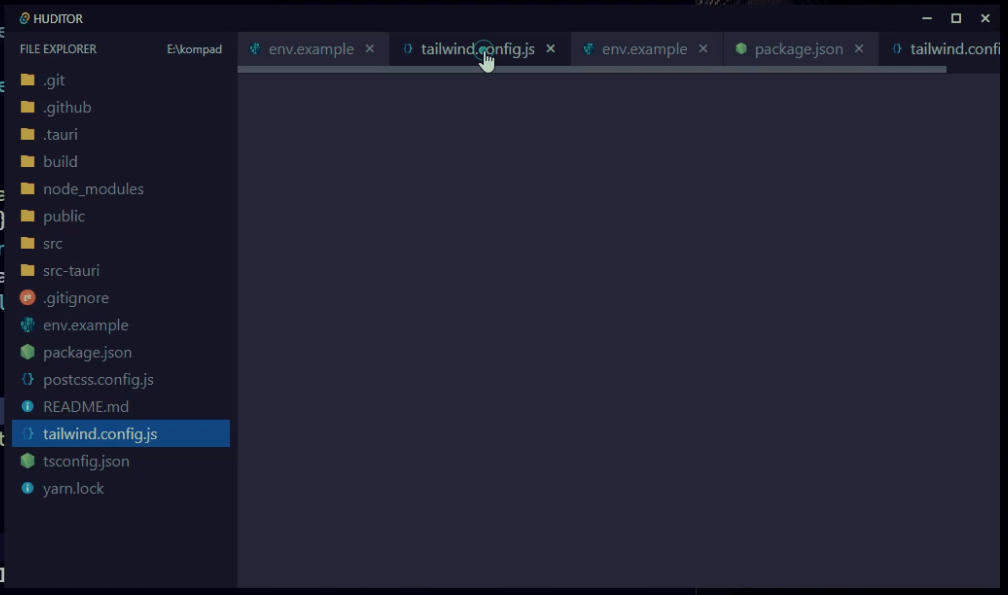
- hiển thị những file đã mở theo dạng tab
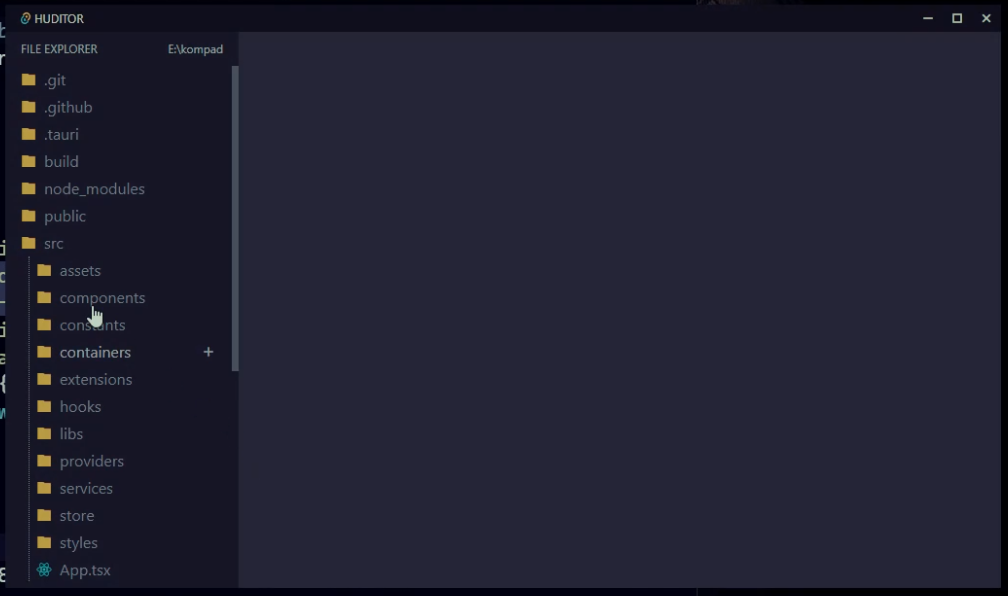
- hiển thị cấu trúc folder
- hiển thị icon của file
Điều kiện cần
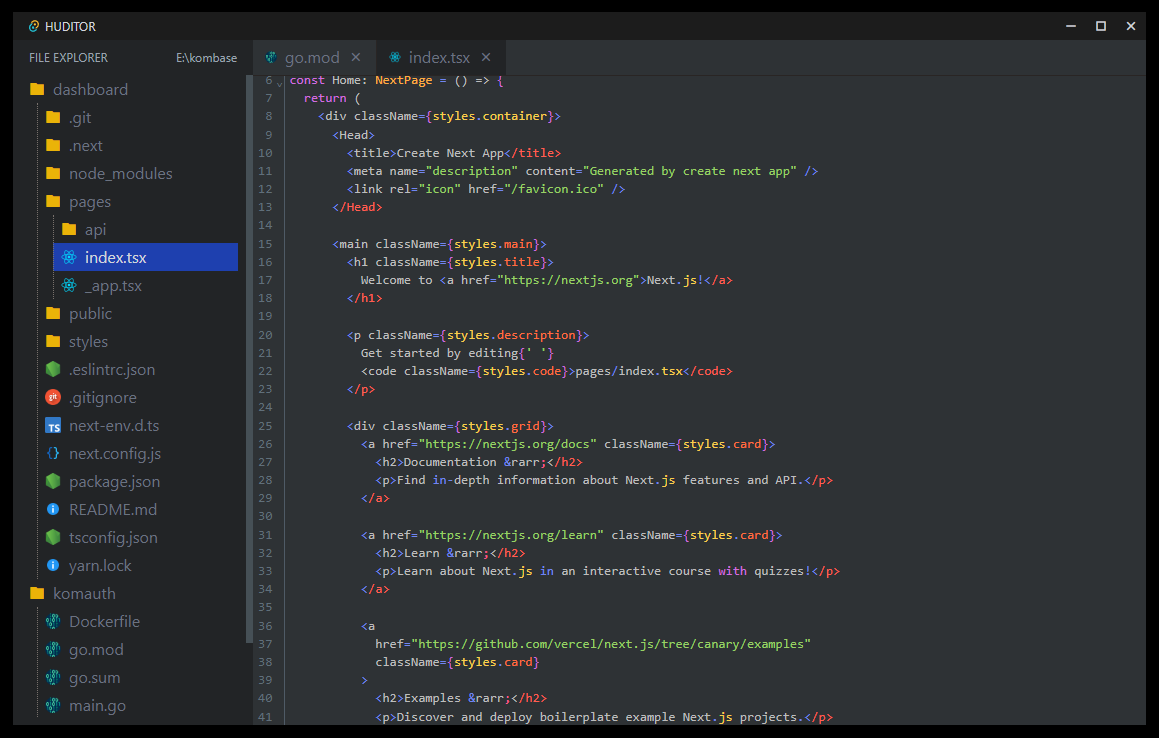
Kết quả cuối cùng:
Source code: https://github.com/hudy9x/huditor
Link tải xuống file cài đặt (window): https://github.com/hudy9x/huditor/releases/download/v0.0.0/huditor_0.0.0_x64_en-US.msi
Nếu ae dùng MacOS thì clone theo địa chỉ repo ở trên và chạy lệnh sau:
// Đảm bảo là ae đã cài đặt Tauri rồi nhé
$ yarn tauri build
Còn nếu ae muốn xem video cho trực quan thì tôi đã upload video lên youtube, ae xem theo link này
{% embed https://www.youtube.com/embed/LUcUn-_KVXo %}
Cấu trúc thư mục
src/
├─ assets/       // file icons
├─ components/   // react components
├─ context/      // data management
├─ helpers/      // file system api & hook
├─ types/        // file object store
├─ stores/       // typesrcipt types
src-tauri/       // tauri core
Và dưới đây là danh sách những package chính được sử dụng trong bài hướng dẫn này
- codemirror - là 1 package về code editor phổ biến
- remixicon - icon, mặc dù chỉ dùng có vài cái 😂
- tailwindcss - css framework
- nanoid - tạo id động
- cm6-theme-material-dark - theme sử dụng cho codemirror
Giải thích luồng hoạt động
Trước khi lao vào code, tôi nghĩ ae nên xem qua tổng quan về cách hoạt động của chiếc code editor mà chúng ta sẽ tạo. Nhìn ảnh bên dưới, ae sẽ thấy rằng, cấu trúc con editor của chúng ta có 4 phần chính: Titlebar, Sidebar, Tab và Editor

Mỗi phần sẽ tương ứng với 1 React component cụ thể. Ví dụ: Tab sẽ là <Tab/> component, Titlebar sẽ là <Titlebar/> component và cứ như thế
Ảnh tiếp theo minh họa luồng xử lý của editor sau khi user chọn 1 thư mục project hoặc click vào 1 file hay folder
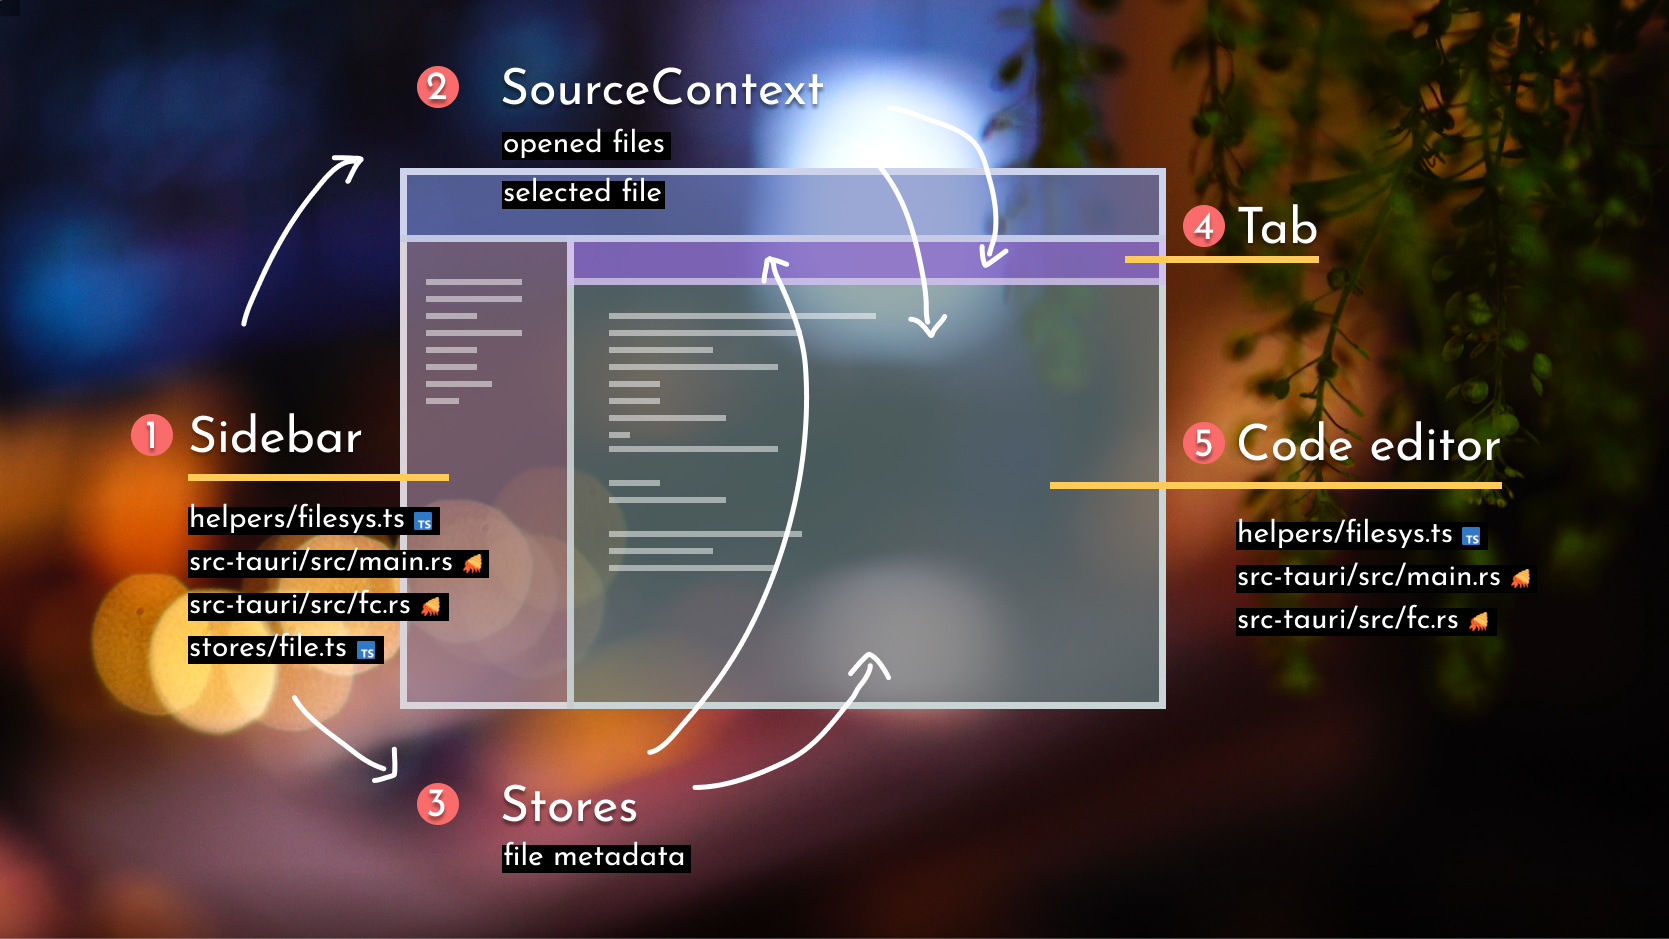
Ban đầu, user upload 1 thư mục project thông qua (1) Sidebar. Tất cả file hay folder sẽ được lưu lại ở (3) Stores = chỉ metadata được lưu, ko lưu nội dung file
Tiếp theo, mỗi khi user click vào 1 file thì id của file sẽ được truyền tới (2) SourceContext - cái này là state management
Khi (2) nhận được một cái selected_file mới thì (4) sẽ thêm mới 1 tab mới có tên file, còn (5) thì hiển thị nội dung của file được chọn 1 cách tự động. Hết
Lưu ý 1 số file quan trọng của editor
Để đọc được nội dung của thư mục (VD: files hoặc folder ) và lấy về nội dung của file thì những file sau đây rất quan trọng:
- helpers/filesys.ts - chứa những functions gọi commands như: reading folder, getting file content, ... từ file
main.rs - src-tauri/src/main.rs - định nghĩa tauri commands, những commands này gọi funcitons của file
fc.rs - src-tauri/src/fc.rs - chứa những hàm chính để thực hiện công việc: đọc nội dung folder, lấy về nội dung file ...
- stores/file.ts - lưu trữ file metadata
OK, chắc thế là đủ lan man rồi, giờ nhảy vào code thôi 🧨
Bắt đầu code nhé ae !
Chạy source phát đã nhé
$ yarn tauri dev
1. Dựng code base
Bước đầu tiên, khởi tạo project. Ae chạy lệnh sau và nhớ chọn 1 package manager hay dùng nhé - tôi thì chọn yarn
$ npm create tauri-app huditor
Cài đặt 1 vài package cần thiết
$ yarn add remixicon nanoid codemirror cm6-theme-material-dark
$ yarn add @codemirror/lang-css @codemirror/lang-html @codemirror/lang-javascript @codemirror/lang-json @codemirror/lang-markdown @codemirror/lang-rust
Trong hướng dẫn này, tôi sẽ sử dụng tailwindcss để style
$ yarn add tailwindcss postcss autoprefixer
Sau khi cài đặt xong package, phần cài đặt còn lại ae xem trên trang chủ cho chính xác nhé - Link hướng dẫn cài đặt
Và để tiết kiệm thời gian, thì t cũng đã viết sẵn style rồi, ae cứ download về dùng: https://github.com/hudy9x/huditor/blob/main/src/style.css
2. Tùy chỉnh lại Titlebar, bỏ mặc định
OK, Chức năng đầu tiên mà chúng ta sẽ làm là Titlebar. Đây là việc dễ dàng nhất trong bài hướng dẫn này. Vì nó chỉ chưa 3 chức năng chính và ae có thể sử dụng appWindow trong package @tauri-apps/api/window để làm
import { useState } from "react";
import { appWindow } from "@tauri-apps/api/window";

export default function Titlebar() {
  const [isScaleup, setScaleup] = useState(false);
  // .minimize() - thu nhỏ cửa sổ
  const onMinimize = () => appWindow.minimize();
  const onScaleup = () => {
    // .toggleMaximize() - để chuyển đổi cửa số từ to sang nhỏ và ngược lại
    appWindow.toggleMaximize();
    setScaleup(true);
  }

  const onScaledown = () => {
    appWindow.toggleMaximize();
    setScaleup(false);
  }

// .close() - đóng cửa sổ
  const onClose = () => appWindow.close();

  return <div id="titlebar" data-tauri-drag-region>
    <div className="flex items-center gap-1 5 pl-2">
      <img src="/tauri.svg" style={{ width: 10 }} alt="" />
      <span className="text-xs uppercase">huditor</span>
    </div>

    <div className="titlebar-actions">
      <i className="titlebar-icon ri-subtract-line" onClick={onMinimize}></i>

      {isScaleup ? <i className="titlebar-icon ri-file-copy-line" onClick={onScaledown}></i> : <i onClick={onScaleup} className="titlebar-icon ri-stop-line"></i>}

      <i id="ttb-close" className="titlebar-icon ri-close-fill" onClick={onClose}></i>
    </div>
  </div>
}
3. Tạo SourceContext
Như đã đề cập ở trên, để component có thể giao tiếp với nhau thì ta cần 1 state manager - <SourceContext/>. Định nghĩa IFile interface trước
// src/types/file.ts

export interface IFile {
  id: string;
  name: string;
  kind: 'file' | 'directory';
  path: string;  // d://path/to/file
}
Tạo 1 file là src/context/SourceContext.tsx. File này chứa 2 thuộc tính là:
selected- chịu trách nhiệm lưu trữ id của file mà user click chọnopened- là 1 danh sách file id. VD: ['387skwje', 'ids234oijs', '92kjsdoi4', ...]
// src/context/SourceContext.tsx

import { createContext, useContext, useState, useCallback } from "react"

interface ISourceContext {
  selected: string;
  setSelect: (id: string) => void;
  opened: string[];
  addOpenedFile: (id: string) => void;
  delOpenedFile: (id: string) => void;
}

const SourceContext = createContext<ISourceContext>({
  selected: '',
  setSelect: (id) => { },
  opened: [],
  addOpenedFile: (id) => { },
  delOpenedFile: (id) => { }
});
Tạo <SourceProvider/> để truyền toàn bộ state tới component con
// src/context/SourceContext.tsx
// ....
export const SourceProvider = ({ children }: { children: JSX.Element | JSX.Element[] }) => {
  const [selected, setSelected] = useState('');
  const [opened, updateOpenedFiles] = useState<string[]>([]);

  const setSelect = (id: string) => {
    setSelected(id)
  }

  const addOpenedFile = useCallback((id: string) => {
    if (opened.includes(id)) return;
    updateOpenedFiles(prevOpen => ([...prevOpen, id]))
  }, [opened])

  const delOpenedFile = useCallback((id: string) => {
    updateOpenedFiles(prevOpen => prevOpen.filter(opened => opened !== id))
  }, [opened])

  return <SourceContext.Provider value={{
    selected,
    setSelect,
    opened,
    addOpenedFile,
    delOpenedFile
  }}>
    {children}
  </SourceContext.Provider>
}
Ngoải ra, tôi cũng tạo ra 1 hook là useSource, nó sẽ giúp việc sử dụng những state ở trên dễ dàng hơn
export const useSource = () => {
  const { selected, setSelect, opened, addOpenedFile, delOpenedFile } = useContext(SourceContext)

  return { selected, setSelect, opened, addOpenedFile, delOpenedFile }
}
4. Tạo Sidebar
Giờ là lúc tạo Sidebar. Tôi đã chia sidebar thành 2 phần:
- một phần dành cho header - gồm 1 button và 1 nơi hiển thị tên dự project
- phần còn lại là
<NavFiles>- hiển thị danh sách file và folder được load khi user click vào button trên phần header
// src/components/Sidebar.tsx
import { useState } from "react";
import { IFile } from "../types";
import { open } from "@tauri-apps/api/dialog";
// ta se tạo <NavFiles> và `filesys.ts` bên dưới
import NavFiles from "./NavFiles";
import { readDirectory } from "../helpers/filesys";

export default function Sidebar() {
  const [projectName, setProjectName] = useState("");
  const [files, setFiles] = useState<IFile[]>([]);

  const loadFile = async () => {
    const selected = await open({
      directory: true
    })

    if (!selected) return;

    setProjectName(selected as string)
    // .readDirectory nhận vào 1 đường dẫn và trả về
    // một danh sách file/folder nằm bên trong nó
    readDirectory(selected + '/').then(files => {
      console.log(files)
      setFiles(files)
    })
  }

  return <aside id="sidebar" className="w-60 shrink-0 h-full bg-darken">
    <div className="sidebar-header flex items-center justify-between p-4 py-2.5">
      <button className="project-explorer" onClick={loadFile}>File explorer</button>
      <span className="project-name whitespace-nowrap text-gray-400 text-xs">{projectName}</span>
    </div>
    <div className="code-structure">
      <NavFiles visible={true} files={files}/>
    </div>
  </aside>
}
Chuẩn bị 1 component <FileIcon /> để hiển thị file thumbnail. Ae lấy danh sách icon ở link repo nhé
// src/components/FileIcon.tsx
// link toàn bộ icon : https://github.com/hudy9x/huditor/tree/main/src/assets
import html from '../assets/html.png';
import css from '../assets/css.png';
import react from '../assets/react.png';
import typescript from '../assets/typescript.png';
import binary from '../assets/binary.png';
import content from '../assets/content.png';
import git from '../assets/git.png';
import image from '../assets/image.png';
import nodejs from '../assets/nodejs.png';
import rust from '../assets/rust.png';
import js from '../assets/js.png';

interface Icons {
  [key: string]: string
}

const icons: Icons = {
  tsx: react,
  css: css,
  svg: image,
  png: image,
  icns: image,
  ico: image,
  gif: image,
  jpeg: image,
  jpg: image,
  tiff: image,
  bmp: image,
  ts: typescript,
  js,
  json: nodejs,
  md: content,
  lock: content,
  gitignore: git,
  html: html,
  rs: rust,
};

interface IFileIconProps {
  name: string;
  size?: 'sm' | 'base'
}

export default function FileIcon({ name, size = 'base' }: IFileIconProps) {
  const lastDotIndex = name.lastIndexOf('.')
  const ext = lastDotIndex !== -1 ? name.slice(lastDotIndex + 1).toLowerCase() : 'NONE'
  const cls = size === 'base' ? 'w-4' : 'w-3';

  if (icons[ext]) {
    return <img className={cls} src={icons[ext]} alt={name} />
  }

  return <img className={cls} src={binary} alt={name} />
}
Rồi, giờ thì chúng ta sẽ render toàn bộ files được truyền từ <Sidebar/>. Ae tạo 1 file gọi là src/components/NavFiles.tsx. Bên trong file này, chúng ta tách xử lý thành 2 phần riêng biệt để: render file và render thư mục
Tôi sẽ giải thích <NavFolderItem/> sau. Còn về phần render file, chúng ta chỉ cần liệt kê toàn bộ file và cung cấp cho mỗi file 1 hành động
Khi user click vào file, ko phải folder nhé, thì gọi hàm onShow và truyền id của file tới state opened trong SourceContext thông qua hàm addOpenedFile
// src/components/NavFiles.tsx

import { MouseEvent } from "react"
import { useSource } from "../context/SourceContext"
import { IFile } from "../types"
import FileIcon from "./FileIcon"
import NavFolderItem from "./NavFolderItem" // file này sẽ tạo bên dưới nhé

interface Props {
  files: IFile[]
  visible: boolean
}

export default function NavFiles({files, visible}: Props) {
  const {setSelect, selected, addOpenedFile} = useSource()

  const onShow = async (ev: React.MouseEvent<HTMLDivElement, MouseEvent>, file: IFile) => {

    ev.stopPropagation();

    if (file.kind === 'file') {
      setSelect(file.id)
      addOpenedFile(file.id)
    }

  }

  return <div className={`source-codes ${visible ? '' : 'hidden'}`}>
    {files.map(file => {
      const isSelected = file.id === selected;

      if (file.kind === 'directory') {
        return <NavFolderItem active={isSelected} key={file.id} file={file} />
      }

      return <div onClick={(ev) => onShow(ev, file)}
        key={file.id}
        className={`soure-item ${isSelected ? 'source-item-active' : ''} flex items-center gap-2 px-2 py-0.5 text-gray-500 hover:text-gray-400 cursor-pointer`}
      >
        <FileIcon name={file.name} />
        <span>{file.name}</span>
      </div>
    })}
  </div>
}
5. Tạo helpers/filesys.ts
Ok, giờ hãy tạo file src/helpers/filesys.ts - file này là nơi kết nối giữa frontend và Tauri core. Tôi sẽ làm rõ hơn chút chỗ này, như ae có thể đã biết, javascript api hiện tại không hỗ trợ đọc/ghi file/folder (tôi cũng đã thử File System Access API, nhưng nó ko thể hỗ trợ tạo thư mục, xóa file, xóa thư mục). Cho nên, ta sẽ phải làm việc này sử dụng rust
Và cách duy nhất để giao tiếp với rust là sử dụng Tauri commands. Diagram bên dưới minh họa cách Taur command làm việc
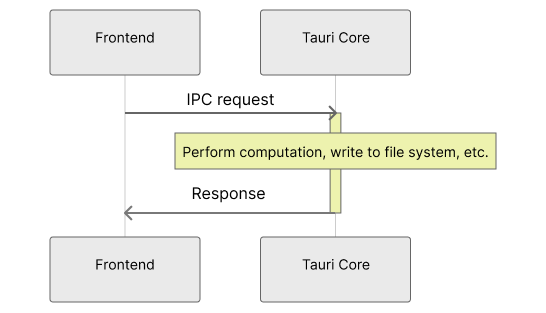
Tauri hỗ trợ 1 function là invoke. Ae hãy import nó từ package @tauri-apps/api/tauri và gọi các command sau: get_file_content, write_file, và open_folder
// src/helpers/filesys.ts
import { invoke } from "@tauri-apps/api/tauri"
import { nanoid } from "nanoid"
import { saveFileObject } from "../stores/file" // tạo file này sau nhé, cứ tạm import đã
import { IFile } from "../types"

export const readFile = (filePath: string): Promise<string> => {
  return new Promise((resolve, reject) => {
    // command này sẽ lấy nội dung của file
    invoke("get_file_content", {filePath}).then((message: unknown) => {
      resolve(message as string);
    }).catch(error => reject(error))
  })
}

export const writeFile = (filePath: string, content: string): Promise<string> => {
  return new Promise((resolve, reject) => {
    // command này thì thực hiện ghi nội dung mới vào file hoặc tạo ra 1 file mới
    invoke("write_file", { filePath, content }).then((message: unknown) => {
      if (message === 'OK') {
        resolve(message as string)
      } else {
        reject('ERROR')
      }
    })
  })
}

export const readDirectory = (folderPath: string): Promise<IFile[]> => {
  return new Promise((resolve, reject) => {
    // command này thì mở folder và lấy toàn bộ file/folder bên trong nó
    invoke("open_folder", { folderPath }).then((message: unknown) => {
      const mess = message as string;
      const files = JSON.parse(mess.replaceAll('\\', '/').replaceAll('//', '/'));
      const entries: IFile[] = [];
      const folders: IFile[] = [];

      if (!files || !files.length) {
        resolve(entries);
        return;
      }

      for (let i = 0; i < files.length; i++) {
        const file = files[i];
        const id = nanoid();
        const entry: IFile = {
          id,
          kind: file.kind,
          name: file.name,
          path: file.path
        }

        if (file.kind === 'file') {
          entries.push(entry)
        } else {
          folders.push(entry)
        }

        // hàm này lưu lại metadata, cái này tôi đã đề cập ở trên rồi
        // ae có thể kéo lên để xem lại
        saveFileObject(id, entry)

      }

      resolve([...folders, ...entries]);

    })
  })
}
6. Tạo file stores/files.ts
File này thì khá là đơn giản, nó chỉ là 1 object như sau
// src/stores/files.ts
import { IFile } from "../types"

// Ex: {
//   "34sdjwyd3": {
//     "id": "34sdjwyd3",
//     "name": "App.tsx",
//     "kind": "file",
//     "path": "d://path/to/App.tsx",
//   },
//   "872dwehud": {
//     "id": "872dwehud",
//     "name": "components",
//     "kind": "directory",
//     "path": "d://path/to/components",
//   }
// }
interface IEntries {
  [key: string]: IFile
}

const entries: IEntries = {}

export const saveFileObject = (id: string, file: IFile): void => {
  entries[id] = file
}

export const getFileObject = (id: string): IFile => {
  return entries[id]
}
7. Định nghĩa Tauri commands
Đây là file quan trọng nhất, tôi đã tạo nó trước rồi, nên ae có thể tìm toàn bộ source code ở đây https://github.com/hudy9x/huditor/blob/main/src-tauri/src/fc.rs. Bên dưới là bản rút gọn của file này, tôi sẽ không giải thích chi tiết, vì t cũng là 1 con ma mới với rust 😢
Nếu có ae nào xử hết được đống warning trong file này, thì update cho t phát nhé, thank trước 🤣, cơ bản là ngại fix
// src-tauri/src/fc.rs
// ...

pub fn read_directory(dir_path: &str) -> String { /**... */ }

pub fn read_file(path: &str) -> String { /**... */ }

pub fn write_file(path: &str, content: &str) -> String { /**... */ }

// Mấy cái hàm bến dưới này không được dùng trong bài hướng dẫn này
// T có tình để lại để ae vọc vạch làm thêm cho nó xịn 😁
pub fn create_directory(path: &str) -> Result<()>{/**... */ }

pub fn remove_file(path: &str) -> Result<()> {/**... */ }

pub fn remove_folder(path: &str) -> Result<()>{ /**... */ }

// ...
Việc duy nhất mà ae cần làm chỉ là định nghĩa mấy cái command. À, còn 1 điều quan trọng mà ae phải nhớ khi định nghĩa command đấy là:
invoke("write_file", {filePath, content}) // frontend
write_file(file_path: &str, content: &str) // tauri command
- write_file : tên là command là phải giống nhau
- tham số trong
invokephải là object với tên tham số được viết dạng camelCase nhé - tham số của tauri command thì phải viết snake_case
Ok, đây là mấy cái command của chúng ta
// src-tauri/src/main.rs

#![cfg_attr(
    all(not(debug_assertions), target_os = "windows"),
    windows_subsystem = "windows"
)]

mod fc;

// Tauri commands: https://tauri.app/v1/guides/features/command
#[tauri::command]
fn greet(name: &str) -> String {
    format!("Hello, {}! You've been greeted from Rust!", name)
}

#[tauri::command]
fn open_folder(folder_path: &str) -> String {
    let files = fc::read_directory(folder_path);
    files
}

#[tauri::command]
fn get_file_content(file_path: &str) -> String {
    let content = fc::read_file(file_path);
    content
}

#[tauri::command]
fn write_file(file_path: &str, content: &str) -> String {
    fc::write_file(file_path, content);
    String::from("OK")
}

fn main() {
    tauri::Builder::default()
        .invoke_handler(tauri::generate_handler![greet, open_folder, get_file_content, write_file])
        .run(tauri::generate_context!())
        .expect("error while running tauri application");
}
Ngon rồi ! phần khó nhất đã xong. Thử xem nó hiện hay ko nhé 😂
8. Hiển thị files/folders trong folder con
Việc cuối cùng cần làm để hoàn thiện cái Sidebar là hiển thị files/folder bên trong thư mục con. Ae tạo 1 file mới là src/components/NavFolderItem.tsx. Nó thực hiện 1 số công việc:
- Khi user click vào folder, sử dụng lại hàm
readDirectoryvà hiển thị toàn bộ file/folder - Tạo 1 file mới using hàm
writeFile - Tái sử dụng
<NavFiles/>để hiển thị file/folder
// src/components/NavFolderItem.tsx

import { nanoid } from "nanoid";
import { useState } from "react";
import { readDirectory, writeFile } from "../helpers/filesys";
import { saveFileObject } from "../stores/file";
import { IFile } from "../types";
import NavFiles from "./NavFiles";

interface Props {
  file: IFile;
  active: boolean;
}

export default function NavFolderItem({ file, active }: Props) {
  const [files, setFiles] = useState<IFile[]>([])
  const [unfold, setUnfold] = useState(false)
  const [loaded, setLoaded] = useState(false)
  const [newFile, setNewFile] = useState(false)
  const [filename, setFilename] = useState('')

  const onShow = async (ev: React.MouseEvent<HTMLSpanElement, MouseEvent>) => {
    ev.stopPropagation()

    // nếu file/folder được load rồi thì chỉ cần hiển thị lại thôi
    if (loaded) {
      setUnfold(!unfold)
      return;
    }

    const entries = await readDirectory(file.path + '/')

    setLoaded(true)
    setFiles(entries)
    setUnfold(!unfold)
  }

  const onEnter = (key: string) => {
    if (key === 'Escape') {
      setNewFile(false)
      setFilename('')
      return;
    }

    if (key !== 'Enter') return;

    const filePath = `${file.path}/${filename}`

    // Tạo mới 1 file khi phím enter được nhấn
    writeFile(filePath, '').then(() => {
      const id = nanoid();
      const newFile: IFile = {
        id,
        name: filename,
        path: filePath,
        kind: 'file'
      }

      saveFileObject(id, newFile)
      setFiles(prevEntries => [newFile, ...prevEntries])
      setNewFile(false)
      setFilename('')
    })

  }

  return <div className="soure-item">
    <div className={`source-folder ${active ? 'bg-gray-200' : ''} flex items-center gap-2 px-2 py-0.5 text-gray-500 hover:text-gray-400 cursor-pointer`}>
      <i className="ri-folder-fill text-yellow-500"></i>
      <div className="source-header flex items-center justify-between w-full group">
        <span onClick={onShow}>{file.name}</span>
        <i onClick={() => setNewFile(true)} className="ri-add-line invisible group-hover:visible"></i>
      </div>
    </div>

      {newFile ? <div className="mx-4 flex items-center gap-0.5 p-2">
      <i className="ri-file-edit-line text-gray-300"></i>
      <input type="text" value={filename}
        onChange={(ev) => setFilename(ev.target.value)}
        onKeyUp={(ev) => onEnter(ev.key)}
        className="inp"
        />
    </div> : null}

    <NavFiles visible={unfold} files={files} />
  </div>
}
Cùng xem kết quả nhé 😍
9. Hiển thị file trên thanh tab
Tiếp theo, hiển thị những file đã được chọn lên thanh tab. Việc này cực đơn giản, ae chỉ cần gọi useSource vì nó chứa mọi thứ ae cần. Giờ, tạo src/components/CodeArea.tsx, bên trong file có 2 phần: 1 là Tab và 1 phần hiển thị nội dung của file
Chú ý rằng codemirror không đọc file ảnh, nên chúng ta phải tạo 1 component khác để hiển thị
import { useRef } from "react"
import { convertFileSrc } from "@tauri-apps/api/tauri"

interface Props {
  path: string;
  active: boolean;
}

export default function PreviewImage({ path, active }: Props) {
  const imgRef = useRef<HTMLImageElement>(null)

  return <div className={`${active ? '' : 'hidden'} p-8`}>
    <img ref={imgRef} src={convertFileSrc(path)} alt="" />
  </div>
}
Sau đó, import component <PreviewImage/> vào <CodeArea/>
// src/components/CodeArea.tsx

import { IFile } from "../types"
import { useSource } from "../context/SourceContext"
import { getFileObject } from "../stores/file"
import FileIcon from "./FileIcon"
import useHorizontalScroll from "../helpers/useHorizontalScroll" // tạo sau nhé
import PreviewImage from "./PreviewImage"
import CodeEditor from "./CodeEditor" // cũng tạo sau nhé 😁

export default function CodeArea() {
  const { opened, selected, setSelect, delOpenedFile } = useSource()
  const scrollRef = useHorizontalScroll()
  const onSelectItem = (id: string) => {
    setSelect(id)
  }

  const isImage = (name: string) => {
    return ['.png', '.gif', '.jpeg', '.jpg', '.bmp'].some(ext => name.lastIndexOf(ext) !== -1)
  }

  const close = (ev: React.MouseEvent<HTMLElement, MouseEvent>, id: string) => {
    ev.stopPropagation()
    delOpenedFile(id)
  }

  return <div id="code-area" className="w-full h-full">

    {/** Khu vực này dành cho thanh tab */}

    <div ref={scrollRef} className="code-tab-items flex items-center border-b border-stone-800 divide-x divide-stone-800 overflow-x-auto">
      {opened.map(item => {
        const file = getFileObject(item) as IFile;
        const active = selected === item ? 'bg-darken text-gray-400' : ''

        return <div onClick={() => onSelectItem(file.id)} className={`tab-item shrink-0 px-3 py-1.5 text-gray-500 cursor-pointer hover:text-gray-400 flex items-center gap-2 ${active}`} key={item}>
          <FileIcon name={file.name} size="sm" />
          <span>{file.name}</span>
          <i onClick={(ev) => close(ev, item)} className="ri-close-line hover:text-red-400"></i>
        </div>
      })}
    </div>

    {/** Khu vực này dành cho nội dung code */}

    <div className="code-contents">
      {opened.map(item => {
        const file = getFileObject(item) as IFile;
        if (isImage(file.name)) {
          return <PreviewImage path={file.path} active={item === selected} />
        }

        return <CodeEditor key={item} id={item} active={item===selected} />

        })}
    </div>
  </div>
}
Để tiện cho việc di chuyển, tôi đã viết 1 sự kiện để scroll thanh tab theo chiều ngang
// src/helpers/useHorizontalScroll.ts
import { useRef, useEffect } from "react"

export default function useHorizontalScroll() {
  const ref = useRef<HTMLDivElement | null>(null)

  useEffect(() => {
    const elem = ref.current
    const onWheel = (ev: WheelEvent) => {
      if (!elem || ev.deltaY === 0) return;

      elem.scrollTo({
        left: elem.scrollLeft + ev.deltaY,
        behavior: 'smooth'
      })
    }

    elem && elem.addEventListener('wheel', onWheel)

    return () => {
      elem && elem.removeEventListener('wheel', onWheel)
    }
  }, [])

  return ref;

}
10. Hiển thị file content
Giờ thì đến lúc chúng ta hoàn thiện toàn bộ chiếc editor này rồi
// src/components/CodeEditor.tsx

import { nanoid } from "nanoid";
import { useEffect, useMemo, useRef } from "react";
import { getFileObject } from "../stores/file";
import { readFile, writeFile } from "../helpers/filesys";

// máy cái packages này sẽ được sử dụng cho codemirror nhé
import { EditorView, basicSetup } from "codemirror";
// mấy cái này được dùng để highlight cú pháp js, markdown, html, css, json, ...
import { javascript } from "@codemirror/lang-javascript";
import { markdown } from "@codemirror/lang-markdown";
import { html } from "@codemirror/lang-html";
import { css } from "@codemirror/lang-css";
import { json } from "@codemirror/lang-json";
import { rust } from "@codemirror/lang-rust";
// theme màu tối cho codemirror
import { materialDark } from "cm6-theme-material-dark";

interface Props {
  id: string;
  active: boolean;
}

export default function CodeEditor({ id, active }: Props) {
  const isRendered = useRef(0)
  const editorId = useMemo(() => nanoid(), [])
  const visible = active ? '' : 'hidden'
  const editorRef = useRef<EditorView | null>(null)

  // lấy metadata từ /stores/file.ts thông qua id của file
  const updateEditorContent = async (id: string) => {
    const file = getFileObject(id);
    const content = await readFile(file.path)

    fillContentInEditor(content)

  }

  // chèn nội dung vào codemirror
  const fillContentInEditor = (content: string) => {
    const elem = document.getElementById(editorId)

    if (elem && isRendered.current === 0) {
      isRendered.current = 1;
      editorRef.current = new EditorView({
        doc: content,
        extensions: [
          basicSetup,
          javascript(), markdown(), html(), css(), json(), rust(),
          materialDark
        ],
        parent: elem
      })
    }
  }

  // lưu lại nooijd ung khi ấn tổ hợp phím Ctrl + S
  const onSave = async () => {
    if (!editorRef.current) return;

    // lấy lại nội dung của codemirror
    // nếu có cách nào khác xịn hơn thì ae bảo tôi phát nhé
    const content = editorRef.current.state.doc.toString();
    const file = getFileObject(id)

    writeFile(file.path, content)
  }

  useEffect(() => {
    updateEditorContent(id)
  }, [id])

  return <main className={`w-full overflow-y-auto ${visible}`} style={{ height: 'calc(100vh - 40px)' }}>
    <div id={editorId} tabIndex={-1} onKeyUp={(ev) => {
      if (ev.ctrlKey && ev.key === 's') {
        ev.preventDefault()
        ev.stopPropagation()
        onSave()
      }
    }}></div>

  </main>

}
Cuối cùng, nếu ko có sơ suất thì, thì đây là quả sản phẩm cuối cùng ae tạo ra 🤣
Kết
Phù, đây là 1 bài hướng dẫn dài v~ ?. Tuy nhiên, hi vọng nó có ích cho ae. Như đã nói, tôi để lại 1 vài chức năng cho ae hoàn thiện nốt như: tạo folder, xóa file. Cứ thoải mái vọc vạch nhé
Cuối cùng, cảm ơn ae đã dành thời gian đọc bài hướng dẫn này. Nếu có bất kì câu hỏi, thắc mắc, đắn đo, hay đề xuất gì thì ae hãy cho t biết.